2021年11月27日星期六

docker 配置Plex Server 的docker-compose.yml


version: "2.1"
services:
plex:
image: linuxserver/plex
container_name: plex
environment:
- PUID=1000
- PGID=1000
- VERSION=docker
- PLEX_CLAIM=your-claim
volumes:
- ./config:/config
- /path/to/your/music/library:/musics:ro
restart: unless-stopped
mem_limit: 700m
memswap_limit: 2000m
devices:
- /dev/dri:/dev/dri #optional
ports:
- 32400:32400


需要注意的几点:

  • PUIDPGID用于配置容器内进程的UIDGID, 全都设置为0表示以root用户运行,如果你这里不是很明白的话可以无脑设置为0以避免部分权限问题

  • mem_limitmemswap_limit属于可选项, 如果你(我)使用 2GB 内存的树莓派你可能会担心超出内存而出现的问题(一般出现在扫描媒体时, 日常占用并不大, 2GB内存足矣),如果你的内存充足的话,完全可以忽略这两个配置项

  • PLEX_CLAIM环境变量用于认证自己的服务器,也是可选, 你可以从 这里 获取(注意需要可用的plex账号), 另外claim的有效期一般只有 4 分钟 ,如果服务器网络不佳,建议先通过执行docker-compose pull拉取镜像之后再获取,防止过期(虽说过期后再重新claim也行)

  • /path/to/your/music/library:/musics:ro 将自己本地的音乐库映射到plex container的/musics目录, 并且只读(roread only),你可以将自己用nextcloudsyncthing同步过来的曲目映射到这里

执行docker-compose up然后静待服务器启动完成, 启动完成后可以访问ip:32400/web进入web界面


2021年11月2日星期二

自动扩展batocera rom所有分区大小,如果可能


batocera 默认密码是    "linux"

you first need to remount the boot partition as writeable. Try on ssh fllowing comand


mount -o remount,rw /boot


You can uncomment the autoresize=true in /boot/batocera-boot.conf to have it attempt to resize the partition again on next boot.


2021年8月17日星期二

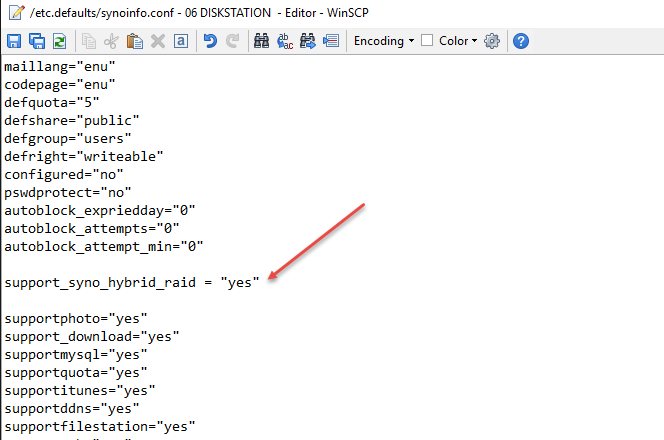
Enable SHR in DSM 6

 Edit the file:

/etc.defaults/synoinfo.conf

Add above the line:

supportphoto="yes"

the following line:

support_syno_hybrid_raid = "yes"

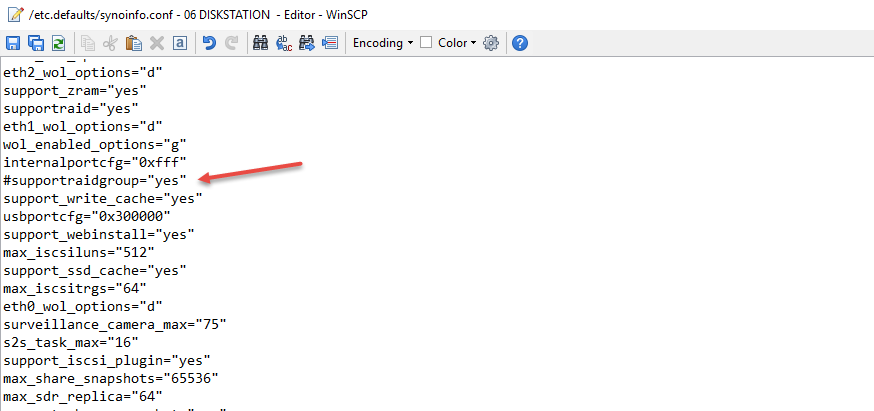
Comment the following line (put a # before the line):

supportraidgroup="yes"

Reboot your diskstation and enjoy SHR again.

2021年7月3日星期六

ubuntu 14.04安装docker和docker compose


  • sudo apt-get update
  • sudo apt-get -y install apt-transport-https ca-certificates curl software-properties-common
  • # step 2: 安装GPG证书
  • curl -fsSL http://mirrors.aliyun.com/docker-ce/linux/ubuntu/gpg | sudo apt-key add -
  • # Step 3: 写入软件源信息
  • sudo add-apt-repository "deb [arch=amd64] http://mirrors.aliyun.com/docker-ce/linux/ubuntu $(lsb_release -cs) stable"
  • # Step 4: 更新并安装 Docker-CE
  • sudo apt-get -y update
  • sudo apt-get -y install docker-ce
  •  


    sudo curl -L https://github.com/docker/compose/releases/download/1.29.2/docker-compose-`uname -s`-`uname -m` -o /usr/local/bin/docker-compose
     
    $ sudo chmod +x /usr/local/bin/docker-compose 


    sudo systemctl restart docker


    2021年5月16日星期日

    Win10远程桌面连接Ubuntu 20.04

    1,设置共享桌面 

    2,安装dconf-editor

    sudo apt-get install dconf-editor

    3,启动dconf-editor,然后打开依次展开org->gnome->desktop->remote-access,将 requre-encryption 设为 False。

    4,安装xdrp

    sudo apt-get  install xrdp

    5,打开win10远程连接,进行连接。这里的用户名填写ubuntu登陆用户,密码填写设置共享桌面的密码


    2021年5月11日星期二

    bcm43228无线网卡驱动安装


    (if you already know you have BCM43228 than skip next line)

    查看有什么网卡

    sudo lshw -class network

    than install drivers (you have to connect to internet via Ethernet cable or Bluetooth)

    安装

    sudo apt install bcmwl-kernel-source
    

    restart network manager

    重启网络服务

    sudo systemctl restart network-manager
    

    now you have wifi card installed and can connect to internet with wifi :)

    完成


    2021年3月25日星期四

    挂载含2 个以上分区镜像


    losetup -f

    查看哪个 loop 设置可用


    losetup -P /dev/loop4 raspberry.img

    挂载 img 文件到 loop4


    mount /dev/loop4p1 /mnt/boot

    mount /dev/loop4p2 /mnt/data


    查看 dd 的进度

      dd if=/agc.img of=/dev/sdd bs=16M


    sudo watch -n 5 pkill -USR1 ^dd$

    5秒刷新一次进度


    查看 cp 的复制情况,勉强算是看进度


    watch lsof -p1234
    1234为 pid


    watch lsof -p`pgrep -x cp`


    2021年3月1日星期一

    ubuntu 安装 batocera


    On Debian/Ubuntu: All of this be easily installed with apt-get:

    sudo apt-get install libsdl2-dev libsdl2-mixer-dev libfreeimage-dev libfreetype6-dev \
      libcurl4-openssl-dev rapidjson-dev libasound2-dev libgl1-mesa-dev build-essential \
      libboost-all-dev cmake fonts-droid-fallback libvlc-dev libvlccore-dev vlc-bin

    Note this Repository uses a git submodule - to checkout the source and all submodules, use

    git clone --recursive https://github.com/RetroPie/EmulationStation.git

    or

    git clone https://github.com/RetroPie/EmulationStation.git
    cd EmulationStation
    git submodule update --init

    Then, generate and build the Makefile with CMake:

    cd YourEmulationStationDirectory
    cmake .
    make


    2021年2月28日星期日

    ubuntu 20.04 安装 docker


    sudo apt install apt-transport-https ca-certificates curl gnupg-agent software-properties-common


    curl -fsSL https://download.docker.com/linux/ubuntu/gpg | sudo apt-key add -
    sudo add-apt-repository "deb [arch=amd64] https://download.docker.com/linux/ubuntu $(lsb_release -cs) stable"
    sudo apt update
    sudo apt install docker-ce docker-ce-cli containerd.io


    一旦安装完成,Docker 服务将会自动启动。你可以输入下面的命令,验证它:

    sudo systemctl status docker

    输出将会类似下面这样:

    ● docker.service - Docker Application Container Engine
         Loaded: loaded (/lib/systemd/system/docker.service; enabled; vendor preset: enabled)
         Active: active (running) since Thu 2020-05-21 14:47:34 UTC; 42s ago
    ...

    当一个新的 Docker 发布时,你可以使用标准的sudo apt update && sudo apt upgrade流程来升级 Docker 软件包。

    如果你想阻止 Docker 自动更新,锁住它的版本:

    sudo apt-mark hold docker-ce


    以非 Root 用户身份执行 Docker

    默认情况下,只有 root 或者 有 sudo 权限的用户可以执行 Docker 命令。

    想要以非 root 用户执行 Docker 命令,你需要将你的用户添加到 Docker 用户组,该用户组在 Docker CE 软件包安装过程中被创建。想要这么做,输入:

    sudo usermod -aG docker $USER

    $USER是一个环境变量,代表当前用户名。

    登出,并且重新登录,以便用户组会员信息刷新。

    卸载 Docker

    在卸载 Docker 之前,你最好 移除所有的容器,镜像,卷和网络。

    运行下面的命令停止所有正在运行的容器,并且移除所有的 docker 对象:

    docker container stop $(docker container ls -aq)
    docker system prune -a --volumes

    现在你可以使用apt像卸载其他软件包一样来卸载 Docker:

    sudo apt purge docker-ce
    sudo apt autoremove


    ubuntu 20.4安装vncserver

     sudo apt install xfce4 xfce4-goodies

    apt install tightvncserver


    vim ~/.vnc/xstartup

    在xstartup文件中更新为如下内容:

    1. #!/bin/bash
    2. xrdb $HOME/.Xresources
    3. startxfce4 &

     然后设置该文档的权限

    chmod +x ~/.vnc/xstartup运下以下命令启动vncservervncserver --localhost no
    nano ~/.vnc/config

    geometry=1920x1084
    dpi=96


    windows下安装 realvnc viewer 后,连接vnc服务器 ip:5901


    vncserver -kill :1
    停止打开的vnc端口


    2021年1月17日星期日

    让Retropie 显示中文

     sudo apt install fonts-droid-fallback

    sudo apt-get install libsdl2-dev libboost-system-dev libboost-filesystem-dev libboost-date-time-dev libboost-locale-dev libfreeimage-dev libfreetype6-dev libeigen3-dev libcurl4-openssl-dev libasound2-dev libgl1-mesa-dev build-essential cmake

    在PVE使用虚拟 USB 存储设备 + ARPL 引导 DSM

      部分内容来自: https://blog.myds.cloud/archives/synoboot-usb-image-in-pve-virtual-machine.html 虚拟机建好之后,打开配置文件 nano /etc/pve/qemu-server/100.conf ...